The beginning of the CSA season always brings a variety of greens. Many come to us as leafy tops to more familiar vegetables like radishes and carrots. Many people throw out these greens because they either don’t realize they are edible or don’t know how to use them. Here are some edible top greens you might see this season. All can be used raw in salads, or cooked like any other tender green.
Harukei turnip greens—fairly mild raw; slight bite cooked
Radish greens—fairly mild raw; moderate bite cooked
Joi Choi/bok choy greens—mild raw and cooked
Kamatsuna greens—mild raw and cooked
Carrot tops—more bitter–use sparingly or make into carrot top pesto (Carrots)
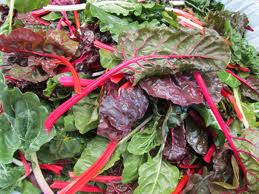
Beet greens—mild raw; red variety can “bleed” some color into cooked dishes.
Turnip green—slight bite raw, moderate bite cooked
CSA General Tip–Make it a “Greens Day”
A great way to use those greens up is to plan a “Greens Day” for pick-up or shortly thereafter. I’ve found that the tender greens or leafy tops available in the distribution tend to go bad more quickly than other produce. For “Greens Day” I either have a meal planned around greens with a specific recipe in mind, or I blanch them to stretch out their use for 3 or 4 more days.
Blanched greens are great to have on hand to add to omelets/frittatas, egg salad, pastas, soups and stews, or to toss with vinaigrette and serve over some kind of noodle or grain. They can also be frozen.
To blanch greens, boil salted water. Add greens and cook just until wilted and tender, 30 seconds for tender greens like chard, or 3-5 minutes for kale or collards. Place in ice water bath to stop cooking and to keep bright green color. Drain well and refrigerate or freeze.
Experiment with mixing different greens to get a bigger yield, since greens tend to shrink down so much when cooked. I like to mix more pungent greens (radish, turnip etc…) with milder greens (chard, spinach) to soften the punch.
Featured Item—Chard
In my opinion, chard is the perfect green. It is bright, tender, and quick cooking, and has a mild flavor that goes with almost anything. Younger chard is tender and mild enough to eat raw. Plus, chard is truly a super food, providing rich sources of vitamins, minerals, fiber, protein, and phytonutrients without a high caloric impact.
Chard is often called Swiss chard, but there is really nothing Swiss about it. It is actually native to the Mediterranean and is gaining popularity the world around.
Chard leaves are a deep, dark green and the crisp stalks can be any number of colors including red, white, yellow, and orange, depending upon the variety. Rainbow chard is a collection of leaves of different chard varieties that give the bunch a “rainbow” of colors.
Choose chard leaves that are unwilted and that have crisp, unblemished stalks. Leaves should not be limp, browned or yellowed. Wrap chard leaves immediately in plastic and refrigerate unwashed until ready to use. Chard is best if used in a couple of days, but it can last up to 5. Clean leaves well as they can hold a lot of sand and grit. I like to run each leaf individually under running water, rubbing both sides to remove stubborn dirt.
As mentioned above, young chard can be eaten raw, like in salads. It is a matter of preference whether or not to include the stalks and center ribs when eating raw chard. Many people find them tough. However, when cooked, stalks are more palatable, although they require more cooking time than the leaves.
One fun way to use healthful raw chard in your diet is in smoothies. See last year’s post for a delicious smoothie recipe, as well as additional chard recipes (Chard).
******************************************************************************
Some of you have asked for recipes for sorrel. I came up with this delicious compound butter as a way to use the wonderfully lemony, tangy sorrel leaves (I chose to leave out the flowers for texture purposes) that are growing at the farm. Remember that younger, smaller leaves will be better than larger, older ones. Avoid leaves that have begun to turn yellow or brown.
Compound butters have a myriad of uses. They add a great finishing touch to grilled meats and fish, or add a delicious base for sautés. They will last at least a week in the refrigerator, but can also be frozen for at least a month. Try different combinations of herbs and spices to make different variations. Just make sure to add a little acid to balance out the flavors. The sky is the limit!
Sorrel Compound Butter makes ½ cup
INGREDIENTS:
– 1 stick unsalted butter, well softened
– 1 tablespoon minced sorrel leaves
– 1/2 tablespoon fresh lemon juice
– 1/4 teaspoon salt
METHOD:
1. In a mini food processor, mix all ingredients until sorrel is very finely minced. If you do not have a mini food processor, make sure sorrel is very finely minced and mix ingredients together by hand.
2. Place a 12” square of parchment paper on a work surface. Place butter in center of parchment and spread evenly into about a 6 inch “log” lengthwise down the parchment. Bring bottom of parchment over butter and then using a bench scraper or the flat edge of a butter knife, press butter mixture toward you, creating a nice round log. Roll log along remaining parchment and then twist ends to seal.
You can also place butter in small ramekins or ice cube trays.
Chill butter for at least 2 hours. Can be frozen for a month. Wrap tightly in plastic.
*********************************************************************************
The original inspiration fro this recipe was something I saw in Bon Appetit, March 2007. I changed the fish from halibut to salmon to up the flavor and nutrition quotient. I also changed the compound butter to sorrel butter. I even threw in some radishes from the week’s distribution. The result was a truly succulent fish dish. Even my son, who claims he hates salmon, ate it heartily (It must be the butter…I tend to use it sparingly)
Swiss Chard Wrapped Salmon w/ Sorrel Butter & Radishes Serves 4
INGREDIENTS:
– 4 large Swiss chard leaves, halved lengthwise, center stem cut out
– 4 6-8 ounce skinned salmon fillets
– 3 large radishes, very thinly sliced (a mandolin works well here)
– 1/2 cup sorrel compound butter (see above recipe)
METHOD:
1. Preheat oven to 450℉. Lay out 4 12-inch square pieces of foil on a work surface.
2. Rinse chard leaves and do not dry. Overlap center edge of two chard leaves on each square of foil. Season fillets with salt and pepper. Place fillets crosswise on widest part of chard. Top each fillet with overlapping slices of radish. Slice compound butter and evenly place on top of radishes (feel free to use less butter, if you prefer). Fold bottom of chard over fillet and then continue to fold chard around fish to make a package, tucking sides in. Enclose fillets tightly in foil and place on a baking sheet so the radish side faces up.
3. Bake packets in oven for about 12-17 minutes, depending upon thickness of your fillets. You can check them with an instant thermometer by poking the thermometer through the foil into the middle of the fish. Fish should read 145 degrees.
4. Remove packets from oven. Carefully open packets (steam is hot) and using a spatula, transfer each wrapped fish to a plate. Pour any juices left over in the foil onto the fish and serve.
*********************************************************************************
I admit that I am a shameless carnivore. It is so hard for me to feel satisfied with a meal that does not contain some kind of animal protein. How delightful it was to me to find that this pizza, which “covered the flavor bases” so well, didn’t leave me craving meat. It was adapted from a recipe from Bon Appetit, January 2002
Swiss Chard, Ricotta, & Provolone Pizza Serves 6
INGREDIENTS:
– 1 bunch Swiss chard leaves, (about 4 cups) trimmed of tough stems, water left clinging to leaves, roughly chopped
– 1 teaspoon olive oil
– 1 clove garlic, minced
Seasoned oil
– 2 tablespoons olive oil
– 1 clove garlic, crushed
– 1/4 teaspoon crushed red pepper flakes
Pizza
– 1 recipe prepared pizza dough for one 12 inch pizza; room temperature if previously chilled
– 1/4 teaspoon kosher salt
– 6 ounces ricotta (preferably fresh)
– 1 1/2 cups shredded sharp provolone cheese
METHOD:
1. If using a pizza stone, place in center of oven. Preheat oven to 500℉.
2. Heat 1 teaspoon olive oil in a large sauté pan until hot. Add garlic and cook, stirring continuously, for one minute. Add wet greens, mix well, and cover pot. Cook, stirring occasionally, until greens are tender. Remove lid and continue to saute a few minutes until liquid is evaporated. Remove from heat and set aside.
3. In a small bowl, mix 2 Tablespoons olive oil, crushed garlic, and red pepper flakes.
4. If using a pizza pan, brush pan lightly with olive oil. Place dough in pan and press to edges. If using a pizza stone, roll out dough and transfer to a pizza paddle. Brush dough with seasoned oil and then sprinkle evenly with kosher salt. Place in oven for 5 minutes, or until just beginning to color. Remove from oven. Using a small spoon, drop dollops of ricotta around pie. Using the back of the spoon spread ricotta out a little (you want discrete areas of ricotta, do not spread across entire dough surface). Sprinkle pizza with chard mixture, and then evenly with provolone. Return to oven and bake an additional 5 minutes, or until cheese has melted and greens are hot.